5. Sharing your Slideshow
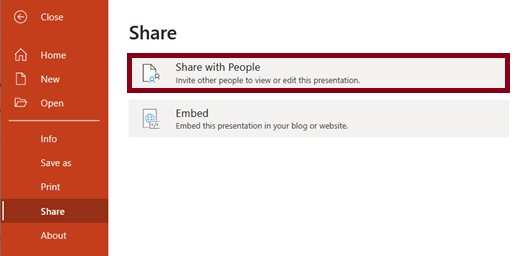
In study Unit 3, Word processing, you were introduced to cloud computing and the opportunities for live collaborative editing of documents. The same concepts apply to presentations in that you might be creating and preparing for a group presentation and need to work collaboratively live on the PowerPoint document or you might want to share a link with the audience to only view and not edit the presentation when you have completed your presentation. Complete the following steps to create a shareable link: 1. Click on File > Share > Share with People
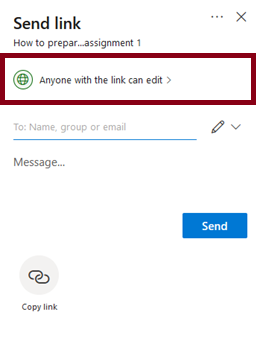
2. For this exercise we do not want to create a link with editing rights. On the Send link box that appears, click on the “Anyone with the link can edit” text.
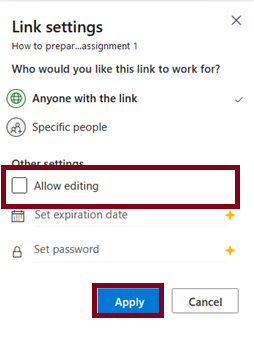
3. On the Link settings box, untick the Allow editing checkbox and click on the Apply button. You will note some additional options that can be set, such as an expiry date of the link or add a password for access.
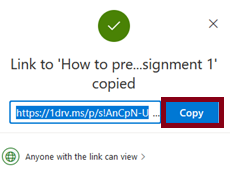
4. Click on the Copy link icon at the bottom of the Send link popup box to generate a shareable link.

5. You can then finally click on the Copy button on the popup box to copy the link to your clipboard.
6. The example document that was created can be accessed with the following link:
https://1drv.ms/p/s!AnCpN-UBCRWec4MAxFpzAdFtMHs?e=ASeZEr
You now have a link that you can paste into an email or group chat. In the discussion forum, paste the link created.
Go to activityConclusion
You have now completed your PowerPoint presentation. In this section you learned how to use the content developed in Lesson 01 to create a PowerPoint presentation. In the next section, Lesson 04, you will learn how to prepare for the delivery of your presentation to a target audience.