3. Add Slides and Content
Now that we have a PowerPoint document, and the document has been set up correctly we can start populating and creating slides. We will use the content created in Lesson 01 as per the Brief at the start of the unit.
6. Conclusion Slide - Duplicating and Arranging Slides
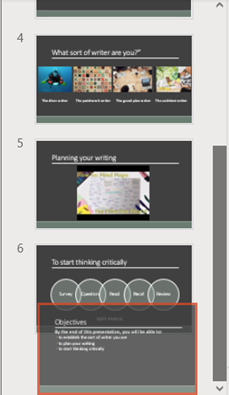
We will now add the final slide to the PowerPoint presentation, the conclusion slide. Since the conclusion slide relates to the object slide, we will duplicate the objectives slide and move the slide to the end.
Complete the steps below:
-
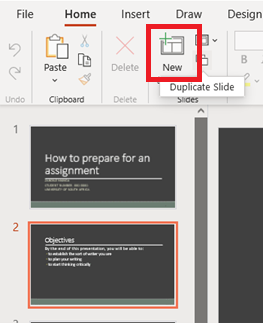
Select the Objective slide and then click on Home > Duplicate slide. Note: You can also duplicate a slide by right-clicking with your mouse on the slide and from the menu select Duplicate.
-
Select the new slide and then while holding in the left mouse button, drag the slide to the end of the slideshow.
-
Change the title of the slide to Conclusion.
-
Update the text of the slide to the following:
You should now know the importance and how to:
establish the sort of writer you are
plan your writing
start thinking critically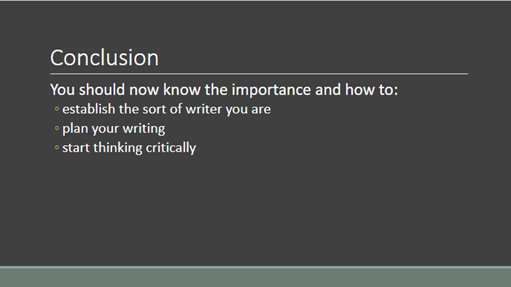
-
Your slide now contains all the required information to support your script and you can now add your script developed in Lesson 1 to the notes section. Below is an example script to add:
In this short workshop, we looked at how to recognise our own strengths and weaknesses, we looked at how to focus on the assignment and to plan our writing. I would recommend that you save the document as the university expects you to work hard and these workshops are designed to help you. I also learnt something by working through the document and I would like to thank the mentoring programme for the opportunity to run this workshop. Before we have tea, I will answer any questions you have.
The conclusion slide is now complete, and you learned how to duplicate and rearrange slides.
Now that the PowerPoint presentation is complete, we will look at the tools available to play and share the slideshow.